Tuesday, 23 December 2014

Vehicle Progress #5

Today I have added a few small updates to my vehicle.  First off I have added a danger notice on the outter wing with a vehicle and I have also added a model number which may contain an easter egg.


I have also added a hazard texture to the back on the vehicle. I will be working more on the back just after Christmas but that's everything for now.


Thanks for reading, 

Daniel Bibby

Wednesday, 17 December 2014

Vehicle Progress #4

This week I have started to texture my vehicle. There is still alot of work to do but so far its looking great. I will be working on the texturing over christmas so I will keep you guys updated. 


I have been taking most of my ideas for my texturing from this picture. 


Well that's everything for now.

Thanks for reading, 

Daniel Bibby


Side Project #2

This week I have added a few more assists to my room such as:
  • Boxes
  • Dragon Long Sword
  • Chairs
  • Posters
  • Another Potion model.


Sadly, I wont be able to work on this project that much for the next couple of week because I wont have the time due to being busy working on my vehicle but once that project is completed I will carry on with this project.


Well that's everything for now.

Thanks for reading,

Daniel Bibby


Wednesday, 10 December 2014

Side Project #1

This week I set myself a challenge to make a side project outside of my degree to see what I could do for myself. To start off I wanted to do something simple so I decided that I wanted to make a simple sword. After making my sword I decided to texture it. I was pretty happy with the outcome so I decided I wanted to add onto this by adding a table and a shield. 

Once I finished this I thought about making this into a project so last night I started to work on a potion table and hopefully I should have the potions table finished very soon so then I can start working on the room itself.


Well that's everything for now.

Thanks for reading,

Daniel Bibby

Vehicle Progress #3

On Monday I decided that I wanted to keep the design that I made last week so that I could start the unwrapping process. 
Basically this week the only thing I have been doing is unwrapping my vehicle, there is still abit of work to do but I'm going to try and get it done this weekend so that I can start the texturing next week.  


Well that's everything for now.

Thanks for reading,

Daniel Bibby

Wednesday, 3 December 2014

Vehicle Progress #2

This week I have been really productive when it comes to my vehicle progress. I have modeled the shape of the vehicle and also added most of the small details.
I should have the modelling finished by next week, I still need to work on the back of the vehicle but apart from that I should be finished by Monday or Tuesday. 


Well that's everything for now. 

Thanks for reading, 

Daniel Bibby

Sunday, 30 November 2014

Character Development Pt2

Since we've started the next assignment I haven't really had the time to do some character development. So far I am thinking about redesigning the logo on my warriors chest plate. I want the logo to look similar to the skull and sword from the Slayer icon. 


I have also been thinking about redesigning my warrior. I was thinking about making him half human and half demon. I want my warrior to have an interesting back story and I think this redesign would help. 


Apart from my redesign ideas, I have also been working on my warrior concept, which I started a few weeks ago. So far I have been adding detail to my warrior's armor and parts of his cape, I still need to work his skin, cape, sword and then I'll be moving onto the background. There is still a lot to do but I shall keep you guys updated in the next character development post. 


Well that's everything for now.

Thanks for reading,

Daniel Bibby


Tuesday, 25 November 2014

Vehicle Progress

Last week, we started a new project which is to design a futuristic vehicle so most of that week I just did research and sketched a few ideas. At first I was going to do a car but the more and more I added onto my idea it turned into a spaceship. 

This week, I have finally done some concept art for my final idea, I think it's looking pretty good but it does need a little bit of work. Also this week I have been working on my 3D model, its looking great so far! At the moment I'm just building the shape of the spaceship, I will be adding some more detail in the weeks to come. 


Well that's everything for now.

Thanks for reading, 

Daniel Bibby

Friday, 21 November 2014

The Next Project

Last week I started the next project which was to design a futuristic vehicle. I spent most of the last week drawing different ideas that I could use. The only problem I had was alot of my designs were very simple and plain so when it came to doing the blueprints they didn't look too good.


When it came to my first design, I decided to draw it on Photoshop to give me a better idea on what it would look like. I have to say I was disappoint on how simple and plan it looked so once I finished this design I decided to expanded on this idea and add some more detail.

After some research I came up with the following: 
I think this design looks so much better so I have decided to use this as my final design. 


I have also made some blueprints for this design, which means I should able to start using 3D MAX next week.


Well that's everything for today guys, I should have a post about my 3D work next week. 

Thanks for reading,

Daniel Bibby

Wednesday, 12 November 2014

Final Renders

Since I started this course back in September I have made a simple box in 3D Max to help me get use to some of the tools in 3D Max. I have also worked on my first assignment which is making a 3D room with a story behind it.


When I first started my room I was going to have the kitchen as a murder scene with police tape on the doors, blood on the floor and a knife which would be missing from the knife rack. Sadly I scrapped this idea due to time, even though I ran out of time I wanted to add a Easter egg to the room by adding a knife with blood on it on top of the fridge. Sadly I couldn't finish this either due to time and having trouble with the lighting. 


Like I mentioned, I had a lot of trouble when it came to adding the lighting at the end, for some reason I just couldn't get it work. What made this problem worse was the fact that on the last day for hand in I still didn't have my lighting sorted out and it was coming to the point were I thought I wouldn't hand it in on time but after messing around with a lot of different lighting, I found some lighting that worked. I was so happy because I got it all finished about 10 minutes before hand in. 


The only problem I have with my final renders is that there were some things I couldn't do due to all the problems I was having such as:
Light coming from the lights, which is a shame because I think this would of made the lighting much better in the room and I wanted light shining in from the windows but I also couldn't do that due to all the problems I was having.


Even though there were some things I couldn't do due to time or problems I still think the room looks really good and I thought it looked great for my first attempt at a 3D room. 


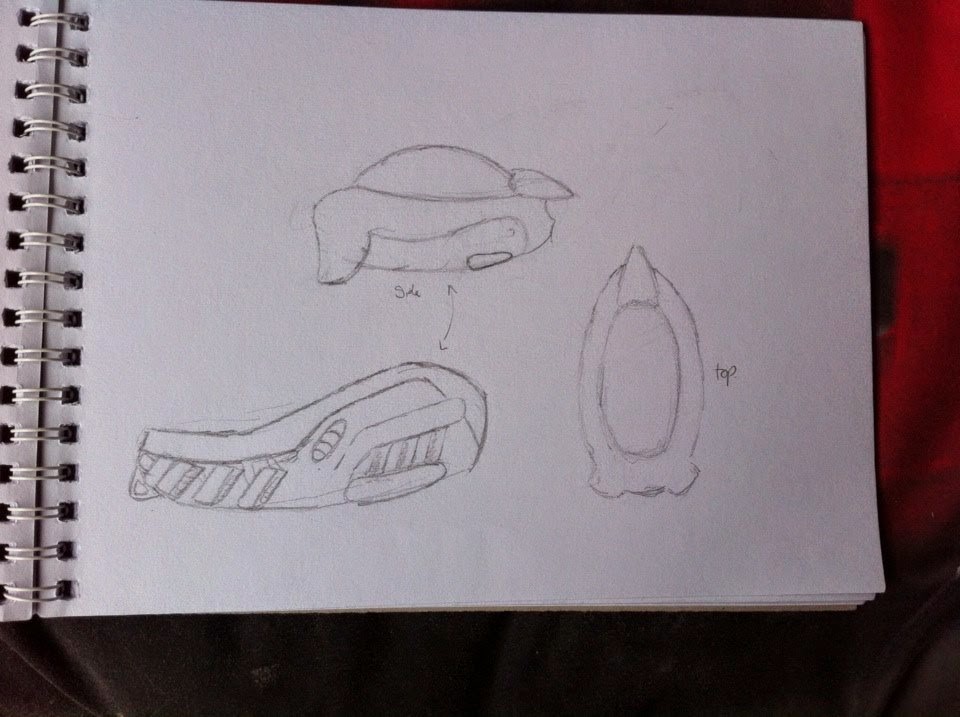
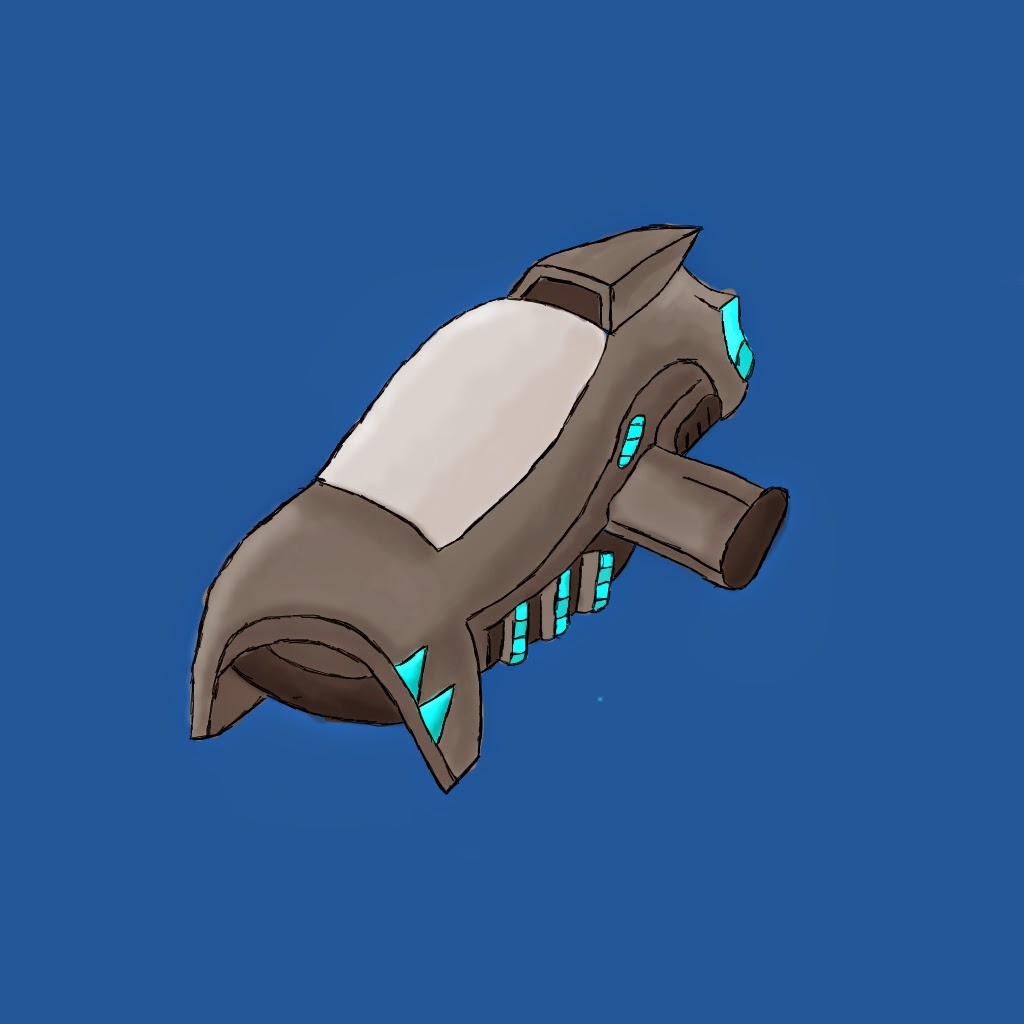
Since hand-in was on Monday we have now started a new assignment which is about futuristic vehicles so I should have some updates (sketches and other ideas) in my next post. 


Well that's everything for today guys, I should have some updates about my next assignment in my next post. 

Thanks for reading,

Daniel Bibby

Friday, 7 November 2014

Life Class

Normally in life class we would draw from manikins but this week was a little different... This week we had to draw from an actual person. I wasn't sure how this was going to go because I'm not the best when it comes to drawing realistic people but I have to say It went pretty well.


That's everything for today guys, I should have a modelling post for next week.

Thanks for reading,

Daniel Bibby

Monday, 3 November 2014

Character Development

It's been a few weeks since I last posted an update about my sketching process, this is because I have been busy trying to get my kitchen done before the deadline. Even though I haven't posted an update about my sketches I have been working on some ideas for my character development.  

I'm thinking of having my character in the Runescape univers. I want him to be a Slayer master which means he will need to be a strong warrior. I have been sketching up some Runescape weaponry and armour to give me an idea on what my warrior should be wearing. 


I want my warrior to have his own backstory so I've been working on some logo ideas. These logo ideas will be used for clan or god purposes.  


Since my warrior is going to be a master of slayer he will be wearing the master slayer cape. Here's a sketch of what the cape will look like. I have also worked on a quick design in photoshop on what the cape will look like on the warrior once it's finished. 


This is what my warrior looks like at the moment, he's wearing bandos armour, bandos godsword and a slayer cape. I have added a custom logo on the sword and the chest plate. I have also started a photoshop version of this sketch, I will have that uploaded in my next development post. 


Well that's everything for now, I should have a modelling post coming very soon.

Thanks for reading,

Daniel Bibby